Standing Broad Jump: How to Measure It, Good Scores & Training
How to perform and measure the standing broad jump correctly, what counts as a good score, and how to use broad jumps to build horizontal power that carries into your vertical jump.
The standing broad jump is the simplest lower-body power test you can run without equipment — and one of the most useful. It measures how much horizontal force you can produce from two feet, which is why it appears in almost every athletic testing battery.
It is also a training exercise, not just a test. Performed for power, broad jumps build hip extension, landing control and the kind of all-out intent that carries directly into vertical jump training.
This guide covers the standard technique, the measurement rules that make scores comparable, realistic reference ranges, and a progression you can run alongside your current plan.
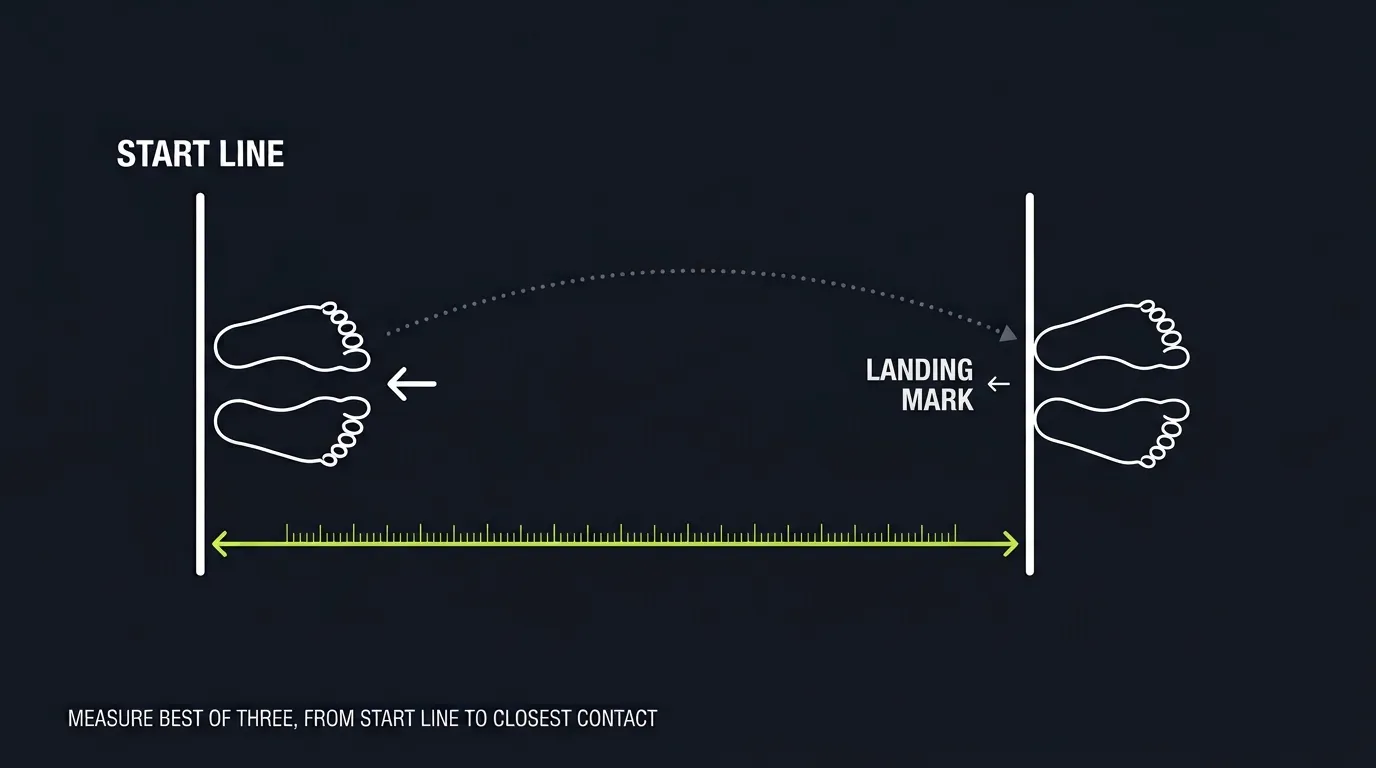
What the standing broad jump actually tests
The broad jump is a horizontal-power test. It combines triple extension of the hips, knees and ankles with an aggressive arm swing, then demands enough coordination to land under control. That makes it a useful proxy for lower-body explosive ability and a common field-test alternative when a jump mat or force plate is not available.
It correlates with vertical jump and sprint acceleration, but it is not the same quality: broad jumps reward horizontal projection and hip drive, while vertical jumps reward upward force at a steeper takeoff angle. Training both directions keeps an athlete powerful in the full movement space basketball and volleyball actually use.
How to perform a standing broad jump
Use the same setup every time so the number means something:
- Stand behind a line with feet about shoulder-width apart and toes just behind the line.
- Dip through the hips and knees while swinging both arms back — the faster the countermovement, the more elastic energy you can reuse.
- Drive the arms forward and up as you extend the hips, knees and ankles together.
- Leave the ground at roughly 20–30 degrees — aim forward, not straight up.
- Reach the legs forward just before landing, then land on both feet and absorb the impact by bending the knees and sitting back slightly.
- Hold the landing for two seconds so the mark is valid.
How to measure a broad jump correctly
Measurement errors are the main reason broad jump scores do not improve on paper. Standardize all four rules:
- Start line: measure from the front edge of the starting line, not from your toes.
- Landing point: record the point of contact closest to the start line — usually the back of the heels, but any hand contact behind you also counts.
- Take the best of three attempts with 60–90 seconds of rest between jumps.
- Measure in cm or inches consistently, and always test with the same shoes, surface and warm-up.
What is a good standing broad jump?
Scores depend on age, sex, sport and training level, so treat these as athlete reference ranges rather than diagnostic thresholds:
- Male, untrained adult: roughly 1.8–2.2 m (71–87 in).
- Male, trained team-sport athlete: roughly 2.3–2.6 m (91–102 in).
- Male, advanced power athlete: 2.7 m (106 in) and above.
- Female, untrained adult: roughly 1.4–1.7 m (55–67 in).
- Female, trained team-sport athlete: roughly 1.8–2.1 m (71–83 in).
- Female, advanced power athlete: 2.2 m (87 in) and above.
Benchmark your own trend
The more useful benchmark is your own trend. A meaningful change for a trained athlete is roughly 3–5% of the current best, and consistent improvements across 8–12 weeks indicate that lower-body power is moving in the right direction.
Broad jump vs vertical jump
Horizontal and vertical power overlap heavily at the hip and knee, but they are not interchangeable. A broad jump shows you can project force; a vertical jump shows you can redirect that force upward while handling a shorter, steeper takeoff.
That is why the broad jump is best used as a supporting test and a training variation. If your broad jump improves while your vertical jump stays flat, the likely limiter is takeoff angle, arm timing or rate of force development — not raw lower-body power.
Broad jump workout and progression
Add broad jumps after a warm-up and before fatiguing strength work, or as a low-volume power block once or twice per week:
- Weeks 1–2: 3 sets × 3 jumps at 80% effort, full rest (90–120 s).
- Weeks 3–4: 4 sets × 3 jumps at 90% effort, focusing on the arm swing and landing.
- Weeks 5–6: 4–5 sets × 3–5 jumps at maximal effort, measuring the best attempt weekly.
- Progressions: seated broad jump, repeated broad jumps, broad jump to sprint, and single-leg bounds for advanced athletes.
Common errors and fixes
Most broad-jump plateaus come from one of these technical faults:
- Jumping too high instead of forward — keep the takeoff angle near 20–30 degrees.
- Crowding the line or starting with a stutter step — start still and use one clean countermovement.
- Landing stiff-legged — the knees must bend to absorb force, or the landing becomes an injury risk.
- Inconsistent measurement — measure from the same line and same landing point every session.
- Practicing on a different surface every week — test and train on the same surface whenever possible.
Common mistakes and how to fix them
Most athletes lose distance to a handful of technique faults rather than lack of power. Correct these before chasing more strength:
- No countermovement — stepping off the line flat-footed kills the elastic recharge. Dip and swing arms back before the takeoff.
- Jumping too steeply — a takeoff angle near 45 degrees trades horizontal distance for height. Leave at roughly 20–30 degrees, aiming forward.
- Landing on a flat foot with knees locked — absorb through the hips, knees and ankles, then hold the mark.
- Straight arms with no drive — arm swing is a large part of horizontal impulse. Swing both arms forward and up hard.
- Inconsistent warm-up — a fully warm lower body adds real centimeters. Use the same warm-up every test day.
How to fit broad jumps into your training
Treat the standing broad jump as both a test and a movement. As a training exercise it slots naturally into a power day, after the main strength work and before anything fatiguing:
A simple way to progress: start with 3–4 sets of 3–5 jumps at 80–90% effort, then move to max-effort jumps when length stays stable and landings stay crisp. Broad jumps pair well with sprints and bounds, and they are a low-cost option to keep horizontal power when you want a break from vertical jumping.
- Tech session: 2×5 submaximal jumps focusing on arm swing and landing.
- Power session: 3×4 at 90–100% with 90 seconds of rest between sets.
- Test day: best of three with the same protocol described above.
Safety boundaries
Broad jumps are a low-equipment test but not a zero-risk exercise. Skip maximal attempts if you have an acute ankle, knee or lower-back injury, if you cannot land quietly from a submaximal jump, or if pain changes your landing pattern.
Youth and beginner athletes should start with submaximal jumps and focus on landing mechanics before chasing distance. If broad jumps consistently provoke pain, replace them with box jumps or a horizontal med-ball throw until a professional clears the pattern.
Key takeaways
- The standing broad jump is a simple, equipment-free test of horizontal lower-body power.
- Measure from the front of the start line to the closest landing contact; best of three.
- Use broad jumps as a supporting test and power exercise, not a replacement for vertical jump testing.
- Reference ranges: trained males are often 2.3–2.6 m and trained females 1.8–2.1 m.
- Track your own trend and treat changes of 3–5% as meaningful.
References
- NSCA Essentials of Strength Training and Conditioning (4th ed.), Ch. 13 — testing and evaluation
- PubMed: Standing broad jump and lower-body power in youth athletes
- Castro-Piñero et al. — field-based fitness test batteries
Keep reading
TESTING & ASSESSMENT
CMJ vs Squat Jump: The Simplest Jump Bottleneck Test
The difference between your countermovement jump and squat jump reveals whether strength or elastic use is your limiting factor.
TESTING & ASSESSMENT
The Force-Velocity Profile: What It Is and Whether You Need It
The F-V profile tells you whether strength or speed is your bottleneck — and when you are not ready for it yet.
TESTING & ASSESSMENT
How to Track Jump Progress Scientifically
One standard test, fixed conditions, weekly frequency and the smallest worthwhile change — the protocol that turns jump data into decisions.
Related exercises
Standing Broad Jump
The most natural horizontal power test — it directly reflects lower-body drive and correlates highly with vertical jump height
Single Leg Bound
Take off on one leg, leap as far and high as possible, land on the same leg and immediately bound again
Depth to Broad Jump
An advanced depth-jump variation — trains vertical-to-horizontal power conversion, highly transferable to game situations like rebounding then pushing the fast break