Approach Jump Technique: The Three Cues That Matter
Penultimate step, block step and takeoff — the three phases that turn horizontal speed into vertical height, with the common approach-jump mistakes that kill distance and how to fix them.
The approach jump is the most common takeoff in basketball and volleyball, and its technique breaks into three phases. Fix the phases in order and the height follows.
The approach jump is a braking problem: horizontal speed must be converted, not stopped. Each phase manages part of that conversion.
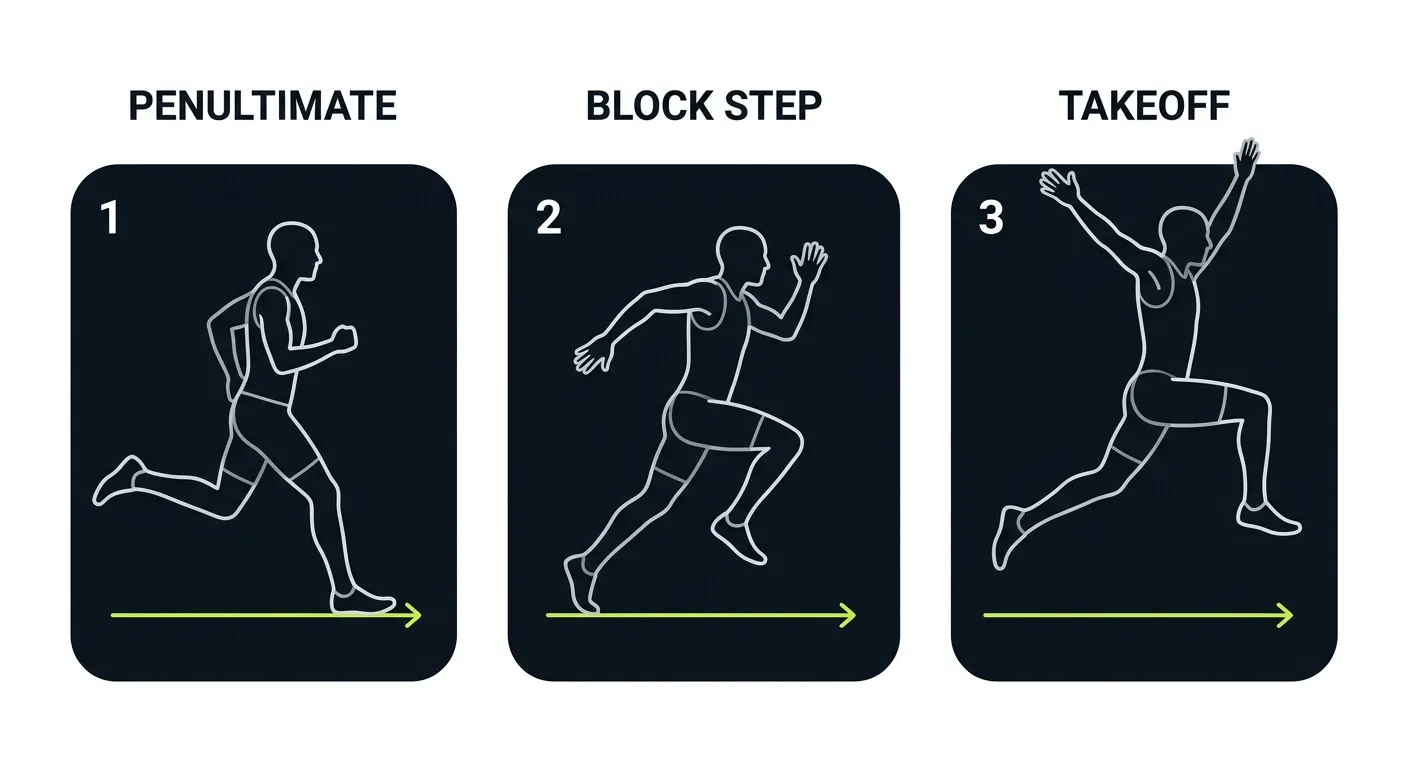
The penultimate step
Slightly lower your center of mass to prepare for braking and drive, rolling heel → full foot → forefoot. Lowering about 5–10 cm is right — too much loses horizontal speed.
The block step
The final step lands toe-first and transitions quickly to the full foot like a brake, converting horizontal momentum into vertical. The foot lands 20–30 cm in front of the center of mass.
The takeoff
Both arms whip up, the free knee drives up fast to add vertical momentum, and the takeoff angle is ~60–75° — not straight up. The whole sequence should feel like braking into a spring.
The two common errors
A block step too far forward over-brakes and kills horizontal speed; one too close leaves horizontal speed unconverted and you jump forward instead of up. Film yourself from the side to check the foot placement.
The mechanics of conversion
Biomechanical analyses of the approach jump show that horizontal velocity is converted during the block step: the foot plants ahead of the center of mass, braking force rises, and the takeoff redirects momentum at an angle of roughly 60–75° from the ground.
The penultimate step sets the conditions — lower the center 5–10 cm without stalling — and the takeoff completes the conversion with the arms and free knee driving up.
How to practice the phases
Break the jump into teachable parts:
- Rhythm runs: repeat the approach without jumping, landing each step cleanly.
- Block-step drills: mark the foot placement 20–30 cm ahead and rehearse the brake.
- Takeoff drills: free knee and arm drive with a short approach.
- Video review: check foot placement, trunk angle and takeoff angle.
Common errors and their fixes
Over-braking usually means the block step is too far forward — shorten it. Jumping forward usually means the step is too close — lengthen it. Losing speed usually means the penultimate lowering is too aggressive — cap it at 5–10 cm.
Key takeaways
- Lower the center 5–10 cm on the penultimate step.
- The block step is a brake: toe-first, then full foot, 20–30 cm ahead.
- Take off at 60–75°, arms and free knee driving up.
- The block step converts horizontal speed — placement decides direction.
- Practice each phase separately, then chain them.
Related calculators
References
- Dapena & Chung (1988) J Biomech
- Stefanyshyn & Nigg (1998) J Biomech
- PubMed: Approach jump takeoff biomechanics
Keep reading
TECHNIQUE
Arm Swing in the Vertical Jump: How Much Does It Matter?
The arm swing contributes 10–15% of jump height. Here is how it works mechanically and how to time it correctly.
TECHNIQUE
How Deep Should the Countermovement Be in a CMJ?
Deeper is not better. Research points to a natural, fluid dip around 90–100° of knee flexion — and speed matters more than depth.
TECHNIQUE
Single-Leg vs Double-Leg Jumps: Which Should You Train?
Two-leg jumps build symmetric force; one-leg jumps build horizontal-to-vertical conversion. Most athletes need both.
Related exercises
Single Leg Bound
Take off on one leg, leap as far and high as possible, land on the same leg and immediately bound again
A-Skip
A core warm-up and running-form movement — A-skips build hip-flexor strength and cadence, directly helping the active knee drive of jumping
Agility Ladder Drill
Make your feet faster and more precise — ladder drills improve neuromuscular efficiency, directly enhancing takeoff-point precision (like the penultimate step before a dunk)